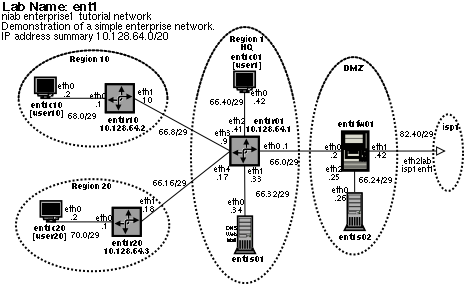
niab ent1
(enterprise1) tutorial
lab
Lab diagram
Lab aim
This is the forth of five labs that make up the niab tutorial. To
complete
the tutorial, it is recommended that you follow the lab-guides in this
order.
demo-lab-guide: Introduction to using niab.
ospf-lab-guide: OSPF tutorial.
bgp-lab-guide: BGP tutorial.
ent1-lab-guide: DNS, email, web
tutorial.
<< You are here !
isp1-lab-guide: Use external lab connections.
Covers the configuration and support of DNS, email clients, email
servers, web
clients and web servers.
Lab overview
View the lab diagram 'ent1.png' supplied with this lab.
The enterprise network consists of:
- Multiarea OSPF network
- Area 0 covers HQ (Head Quarters)
- Area 10 covers region 10.
- Area 20 covers region 20.
- All 3 routers ent1r01, ent1r02 and ent1r03 are ABR's
- ent1r01 is also an ASBR
- Two servers, ent1s01 (internal server), ent1s02 (DMZ server)
- ent1s01
- DNS Service (bind), domain name = ent1.niab.info
- Mail service (exim)
- Web Server Service (apache)
- ent1s02
- no services currently configured
- Three client hosts, ent1c01, ent1c10, ent1c20.
- email client
- mutt text based email client
- courier imap for reading mail
- exim MTA for sending mail
- lynx text based web client.
- Three users
- username: user1 password: guest [valid on ent1c01]
- username: user10 password: guest [valid on ent1c10]
- username: user20 password: guest [valid on ent1c20]
- One Firewall, ent1fw01, protecting the enterprise network and
creating a DMZ.
Lab instructions
1) Restore
the lab
We perform
the same steps as described in the 'demo' tutorial.
- start the
lab
[ncarter:~/niab-labs/ent1]>niab
start
[ncarter:~/niab-labs/ent1]>
- wait for
nodes to boot (tail log/*.log file to view boot progress)
- restore the
lab configuration
Only attempt
this once all the nodes are fully booted.
[ncarter:~/niab-labs/ent1]>niab
restore
niab: node
'ent1c01' config restored from ./node-configs/ent1c01
niab: node
'ent1c10' config restored from ./node-configs/ent1c10
niab: node
'ent1c20' config restored from ./node-configs/ent1c20
niab: node
'ent1fw01' config restored from ./node-configs/ent1fw01
niab: node
'ent1r01' config restored from ./node-configs/ent1r01
niab: node
'ent1r10' config restored from ./node-configs/ent1r10
niab: node
'ent1r20' config restored from ./node-configs/ent1r20
niab: node
'ent1s01' config restored from ./node-configs/ent1s01
niab: node
'ent1s02' config restored from ./node-configs/ent1s02
[ncarter:~/niab-labs/ent1]>
- stop the lab
[ncarter:~/niab-labs/ent1]>niab
stop
[ncarter:~/niab-labs/ent1]>
- wait for
nodes to stop
- start the
lab
Only attempt
this once all nodes have stopped.
[ncarter:~/niab-labs/ent1]>niab
start
[ncarter:~/niab-labs/ent1]>
- wait for
nodes to boot (tail log/*.log file to view boot progress)
2) Connect to
node ent1s01, and log in as user root.
If you are
running X-Windows:
[ncarter:~/niab-labs/ent1]>niab
term ent1s01
[ncarter:~/niab-labs/ent1]>
An xterm
connected to ent1s01, displaying a login prompt, will appear.
If you are
not running X-Windows:
- use 'niab
nodes' command to find out which tcp port is bound to ent1s01
- telnet to
the tcp port
3) Check
local DNS service
- Perform DNS
lookup on a host name
ent1s01:~#
host ent1c01
ent1c01.ent1.niab.info
A 10.128.66.42
ent1s01:~#
- Perform DNS
lookup on FQDN (Fully Qualified Domain Name)
ent1s01:~#
host ent1c01.ent1.niab.info
ent1c01.ent1.niab.info
A 10.128.66.42
ent1s01:~#
- Perform DNS
lookup on web server record
ent1s01:~#
host www.ent1.niab.info
www.ent1.niab.info
A 10.128.66.34
ent1s01:~#
- Perform DNS
lookup on mail server record
ent1s01:~#
host mail.ent1.niab.info
mail.ent1.niab.info
A 10.128.66.34
ent1s01:~#
4) Check
connectivity
All hosts in
this lab should be able to ping each other.
- ping each
remote host
ent1s01:~#
ping -c 2 ent1c01
PING
ent1c01.ent1.niab.info (10.128.66.42): 56 data bytes
64 bytes from
10.128.66.42: icmp_seq=0 ttl=63 time=5.6 ms
64 bytes from
10.128.66.42: icmp_seq=1 ttl=63 time=2.8 ms
---
ent1c01.ent1.niab.info ping statistics ---
2 packets
transmitted, 2 packets received, 0% packet loss
round-trip
min/avg/max = 2.8/4.2/5.6 ms
ent1s01:~#
Repeat for
the other 7 remote nodes.
If any of
these pings fail then its time to start troubleshooting, either the
DNS
resolution or network connectivity.
5) Check
local web service (apache)
- start the
lynx text based web client.
ent1s01:~#
lynx www.ent1.niab.info
You should
see a text based version of the apache homepage.
You will not
be able to follow many of the links, as our lab is currently not
connected to
the Internet. [Connecting to the Internet will be covered in the
final lab
tutorial called isp1.]
Press 'q' to
exit
6) Check the
local mail service (exim)
- Tell exim
to read the current email queue
ent1s01:/etc/exim#
exim -q
ent1s01:/etc/exim#
- Check exim
completed reading the current email queue
ent1s01:/etc/exim#
tail -n 2 /var/log/exim/mainlog
2004-06-26
13:34:31 Start queue run: pid=246
2004-06-26
13:34:31 End queue run: pid=246
ent1s01:/etc/exim#
7) Connect to
node ent1c01, and log in as user: user1 password: guest.
If you are
running X-Windows:
[ncarter:~/niab-labs/ent1]>niab
term ent1c01
[ncarter:~/niab-labs/ent1]>
An xterm
connected to ent1s01, displaying a login prompt, will appear.
If you are
not running X-Windows:
- use 'niab
nodes' command to find out which tcp port is bound to ent1s01
- telnet to
the tcp port
8) Check
remote DNS service
user1@ent1c01:~$
host ent1c01
ent1c01.ent1.niab.info
A 10.128.66.42
user1@ent1c01:~$
- Perform DNS
lookup on web server record
user1@ent1c01:~$
host www.ent1.niab.info
www.ent1.niab.info
A 10.128.66.34
user1@ent1c01:~$
- Perform DNS
lookup on mail server record
user1@ent1c01:~$
host mail.ent1.niab.info
mail.ent1.niab.info
A 10.128.66.34
user1@ent1c01:~$
9) Check
remote web service (apache)
- start the
lynx text based web client.
user1@ent1c01:~$
lynx www.ent1.niab.info
You should
see a text based version of the apache homepage.
Press 'q' to
exit
10) Repeat
remote tests from ent1c10, username: user10, password: guest
- Login to
ent1c10
- Check
remote DNS resolution
- Check
remote web service
11) Set up
user email directories on email server
We need to
create directories to hold email for each user on the email server
(ent1s01)
Login to
ent1s01 as root
Create home
directories for the three users
ent1s01:~#
mkdir /home/user1
ent1s01:~#
chown user1 /home/user1
ent1s01:~#
chgrp 500 /home/user1
ent1s01:~#
mkdir /home/user10
ent1s01:~#
chown user10 /home/user10
ent1s01:~#
chgrp 500 /home/user10
ent1s01:~#
mkdir /home/user20
ent1s01:~#
chown user20 /home/user20
ent1s01:~#
chgrp 500 /home/user20
ent1s01:~#
Check home
directories are created with correct permissions.
ent1s01:~# ls
-l /home
total 4
drwxr-xr-x
2 niab
niab 1024 Jun 30 21:54
niab
drwxr-sr-x
3 user1
500 1024 Jun 30
22:37 user1
drwxr-sr-x
2 user10
500 1024 Jun 30
22:37 user10
drwxr-sr-x
2 user20
500 1024 Jun 30
22:37 user20
Create email
directories for user1
Login to
ent1s01 as user1
user1@ent1s01:~$
maildirmake Maildir
user1@ent1s01:~$
Create email
directories for user10
Login to
ent1s01 as user10
user10@ent1s01:~$
maildirmake Maildir
user10@ent1s01:~$
Create email
directories for user20
Login to
ent1s01 as user20
user20@ent1s01:~$
maildirmake Maildir
user20@ent1s01:~$
12) Send
email from user1 to user10
- login to
ent1c01 as user1.
- start the
mutt email client
user1@ent1c01:~$
mutt
Username at
ent1s01.ent1.niab.info: user1
Password for
user1@ent1s01.ent1.niab.info: guest
You should
now have an the following INBOX mapping
imap://ent1s01.ent1.niab.info/INBOX
- Write an
email
Press the
<m> key (for new mail)
To: user10
Subject: test
email 1
[ Enter the
body of the email using the nano editor]
user10,
This is the
first test email
from
user1 on ent1c01
to
user10 on ent1c10
via
the mailserver ent1s01
Please reply
to me if you recieve this.
Ta
user1
^x
<Ctrl> 'x' to exit
Save modified
buffer ?
press the
<y> key
press the
<return> key
- send the
email
press the
<y> key
Mail
sent. << This should be displayed at bottom of the
screen.
- login to
ent1c10 as user10.
ent1c10.ent1.niab.info
login: user10
Password:
guest
- start the
mutt email client
user10@ent1c10:~$
mutt
Username at
ent1s01.ent1.niab.info: user10
Password for
user10@ent1s01.ent1.niab.info: guest
- Read new
email
user10 should
have recieved the email sent by user1. If you do not see a new
message in
your imap inbox, then wait a minute and it should arrive.
[In this lab
mutt is configured to check the inbox for new messages every
60s.
This default is set in the /etc/Muttrc file]
press the
<return> key to read the message
Envelope-to:
user10@ent1s01.ent1.niab.info
To:
user10@ent1s01.ent1.niab.info
Subject: test
email 1
From:
user1@ent1s01.ent1.niab.info
user10,
This is the
first test email
from
user1 on ent1c01
to
user10 on ent1c10
via
the mailserver ent1s01
Please reply
to me if you recieve this.
Ta
user1
13) Reply to
the email
Press the
<r> key to reply.
To:
user1@ent1s01.ent1.niab.info
Subject: Re:
test email 1
Include
message in reply? ([yes]/no):
[ Enter the
body of the email using the nano editor]
user1,
ACK !
user10
^x
<Ctrl> 'x' to exit
Save modified
buffer ?
press the
<y> key
press the
<return> key
- send the
email
press the
<y> key
Mail
sent. << This should be displayed at bottom of the
screen.
- Check the
reply is recieved by user1 on ent1c01.
13) Have a
play ! If you completely break the lab, you can easily restore the
original
settings using the 'niab restore' command on the host system.
14) Move on
to the next tutorial lab (isp1)
Note that
this time we do not stop the lab before moving on to the isp1
tutorial
lab. Each niab user can run multiple labs and the labs can be
joined
together.
The next tutorial lab isp1, demonstrates this by being run alongside
the ent1 lab
and by being joined to the ent1 lab.
Appendix 1:
IP Subnetting (ent1 tutorial lab)
10.126.64.0/20
- Lab summary
10.126.64.0/24 - 256 x /32 dummy0
10.128.65.0/24 - Unassigned
10.128.66.0/24 - 32 x /29 HQ LAN links
10.128.67.0/24 - 64 x /30 HQ WAN links
10.128.68.0/24 - 32 x /29 Region 10 LAN links
10.128.69.0/24 - 64 x /30 Region 10 WAN links
10.128.70.0/24 - 32 x /29 Region 20 LAN links
10.128.71.0/24 - 64 x /30 Region 20 WAN links
10.128.72.0/24 - 10.128.79.0 - unassigned